Tuesday, January 27, 2015

Xiaomi Mi4 to be Launched on January 28 in Flipkart

hinese smartphone maker Xiaomi has scheduled the Xiaomi Mi4 India Launch for January 28, 2015. The company, which entered the Indian market last year, has launched three devices here so far — Redmi 1S, Redmi Note 4G and Mi3 in partnership with e-commerce major Flipkart. Now the Xiaomi Mi4 India Launch will take place at a launch event as usual, followed by the flash sale on Flipkart. It is expected to be priced below Rs. 20,000. Below we have provided all the specifications & Details.

Xiaomi Mi4 India launch set for Jan 28:

               Last week, Xiaomi had launched its flagship smartphones, the Mi Note and Mi Note Pro, at an event in Beijing. Earlier, Xiaomi India Head Manu Jain had said the company would aggressively expand its product portfolio in India, which is its largest market after China. Xiaomi has started sending media invites for the launch event on 20 January in Delhi. After launching the device, Xiaomi will start the pre-registrations and the device will go on sale from 3 February.
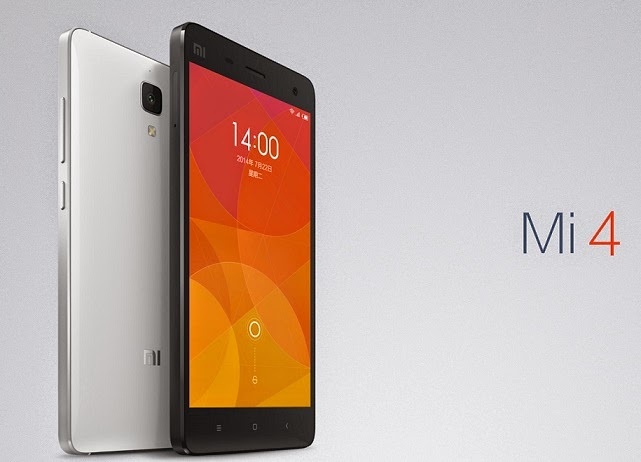
           In the design department, Xiaomi’s Mi4 looks a lot similar to the Apple’s iPhone 5S. It is a mix of steel and plastic, flaunts a stainless steel banding running around the sides with white plastic inserts and swappable back panels which include options that resemble to wood, leather and jute, to those with marble finish, woolen finish, colourful denim finish and more.

Xiaomi Mi4 key Specifications:

        The Xiaomi Mi4 is the first flagship from the Chinese smartphone manufacturer to hit the market in 2015, and India has been one of Xiaomi’s most profitable places for business. Mi4 comes in a 5-inch form factor equipped with Full-HD resolution display combined with one-glass solution (OGS). That’s not all, Mi4 packs the 2.5GHz quad-core Snapdragon 805 chipset, clubbed with 3 GB RAM and offering 16GB internal storage
5 inch FHD IPS screen

2.5 GHz quad core processor

3 GB RAM

Adreno 330 GPU

13 Megapixel rear camera with dual LED Flash

8 Megapixel front camera

3,080 mAh battery

16 GB or 64 GB Internal Storage

Android 4.4.3 with a layer of MIUI OS skin
Xiaomi Mi4 has connectivity options include 3G, GPRS/EDGE, Wi-Fi, GPS/AGPS, GLONASS, NFC, Wi-Fi Direct WLAN, Bluetooth, USB OTG and Micro-USB. It packs a 3,080 mAh Battery. It comes with a 13MP rear camera with LED Flash, Sony IMX214 BSI sensor and 4K video recording. With a 8MP front camera, the smartphone comes with Android 4.4.3 KitKat pre-installed, with a layer of the MIUI OS skin. The device measures 139.2 x 68.5 x 8.9mm and weighs 149 grams.

Xiaomi Mi4 comes in White color. It will be launched in India on 28 January, its price will be below Rs. 20,000. It will go on sale exclusively on Flipkart. Most likely Mi4 flash sales will begin on 3rd February at 2PM on Flipkart

5 Problems WhatsApp Web Browser can't face

With more than 700 million monthly active users, there’s no doubt that WhatsApp is one of the largest mobile-focused messaging service. Most of its users are asking for PC interface for the service to stay connected with your favorite people even when they switch devices. After a long wait Whats App finally took a first step to provide its access on a PC. Even now there are several limitations attached to it as the interface is limited to a web browser.This ability to use WhatsApp in a browser, while working on a desktop, is a cool addition

1.Whatsapp doesn’t support iPhone:

WhatsApp for web essentially syncs messages between your smartphone and browser via its servers. At this time, the service does not support the iPhone. According to WhatsApp, it was unable to provide the web client to iOS users due to Apple’s platform limitations. Reports indicate that it intends to support the iPhone in the future but till then, if you use WhatsApp on an iPhone, you’ll need to peep into your phone every time you get a WhatsApp message even if you’re in front of your computer.

2.Mobile should be always on and Connected to Internet:

 User will be able to send and receive messages through your browser after pairing smart phone with WhatsApp web client through QR Code image. Sadly what’s app is only available on web browser when phone is connected to internet. So this is a drawback as phone should be connected to Internet for the web client to work


3.You Can’t Create and Leave groups:

While you can send and receive messages from groups you’re a part of, the WhatsApp web client doesn’t let you create new groups or leave existing ones. You also can’t send broadcast messages via the web client.

4.Supports only Google Chrome:


 WhatsApp web Interface is only supporting Google Chrome. This is also a drawback as many IT Environments do not support the applications if not approved by Administrators. If you are part of such environment and restricted to use chrome WhatsApp doesn’t work for you.

5.You can’t Block users:

To block users, you still need to go to the WhatsApp mobile app. The number of spam messages on WhatsApp has gone up considerably and the only way to deal with these, is to block their number. Unfortunately, the web version does not offer the block feature.


Monday, January 26, 2015

Windows 10 Free Download 32 Bit and 64 Bit 2015

Microsoft announced its new Windows Operating System Windows 10 turning down the forecast of the tech world and its users about the successor of Windows 8 as Windows 9. Windows has been one of the most widely used operating system across the globe in smart devices with easygoing user interface and features. Microsoft introduced the first chapter of our Windows 10 story, talking about the many ways Windows 10 is great for business on 30th September 2014. Download the latest updated Windows 10 OS for your operating system exclusively for your PC/Laptop.

Windows 10 Overview

Microsoft has exposed its new advanced OS Windows 10 technical aspects past day at its Redmond Campus.  Microsoft has always been surprising its users with the news features to its applications and software’s to enhance and enrich the user interface simplifying the daily tasks of its users. I would commend the readers to download the Windows 8/8.1 initially for those who haven’t explored it as it is going to make a huge difference after the launch of Windows 10. The much anticipated Windows 10 has been built with lot of care as told by one of the executives in during the technical preview of Windows 10 for consumers. The major issues which were raised by the users across the globe with the Windows 8 have been addressed like bringing back the start men Metro style interface. In general terminology, we can say that users of Microsoft would witness features of Windows 7 and Windows 8 in the latest upgraded Windows 10.
Microsoft Windows 10 has been received well by the tech experts and geeks around the world as major issues were addressed in this version of operating system. Microsoft has relinquished the Windows OS 10 free version for its loyal users which is easily upgradable. Microsoft Windows 7 and Windows 8/8.1 users can easily upgrade to the new version of its OS. It would be appreciable part on readers if you try out this new version of Windows with all cautiousness since it is a newly built OS it may some unresolved unidentified bugs.

Windows 10 Technical Preview Features

Windows 10 have been impressing most of the tech experts and tech geeks across the world. Till date, it has got a good response from the consumers and wish to do well. Here are some captivating features of Windows 10.
         Start Menu with live tiles.
         Metro interface of features Windows 8 and Windows 7
         Virtual Desktop features
         Microsoft’s personal assistant Cortana availability
         Users can view task view option with the arrays of virtual desktops.
         Multiple desktops feature allows easy swapping between desktops.
         Improved search in upgraded windows.
        Quick switching with new taskbar buttons

Windows 10 Consumer Preview features

         Past day at Redmond campus of Microsoft Consumer Preview of Windows 10 was annunciated. Here some of the captivating Consumer Preview features of Windows 10

Windows 10 will be a completely free upgrade for current Windows 7 and Windows 8 users. 

Microsoft’s personal assistant Cortana availability. 

Powered by Windows 10’s Spartan—a new browser built around a new rendering engine.

Windows Holographic initiative, which overlays smart, timely info atop the physical world—kind of             like a more robust version of Google Glass.

Comes with Surface Hub which is packed with connective technologies—Bluetooth, Wi-Fi, motion         detectors, a camera, microphone.

Windows 10 comes to phones and tablets by highlighting key features that draw the devices closer to PCs. 

Improved PC Gaming with a native screen shooting and video capture tool, capable of capturing the last 30 seconds of gameplay from any game. 

Windows 10’s has the potent of Xbox streaming. Comes with intelligent Continuum UI switching. 
Explore vast options and lot more features and specs downloading and installing Windows 10 ISO.

You can upgrade for Windows 10 for free if you are already using windows 7 or 8.1 version of windows. But only few qualified customers can do it. Click Here for more details.


Technical Specifications of Windows 10

Name of the software: Windows 10 Technical overview available in 32 bit and 64 bit versions with English mainstream language.
Name of the Setup file: Windows Technical Priview-9879-x32-EN-US.iso (32 Bit), Windows Technical Preveiw-9879-x32-EN-US.iso (64 Bit)
Type of Setup: Offline Installer/Full Standalone Setup:
Compatibility Architecture: 32Bit(x86)/64 Bit(x64)
Latest Added Version: 2nd October 2014


Thursday, January 22, 2015

Amazon Republic Day Deals Offers Parade Sale 23 to 26 January 2015

As we all know Online Shopping has been immensly booming in India. With the growth of many Ecommerce stores in India the competition has grew up. To reach the market different brands are coming with great deals every week. Major brands like Flipkart, Amazon and Snapdeal are offering huge discounts compared to other brands. On the occassion of Republic Day Amazon has came up with a new sale called as “Amazon Republic Day Parade Sale” starting from 23rd to 26th of this month i.e January. The best thing about the sale is free shipping on all the orders. So, you wouldn’t have to pay extra for shipping which is one more savings area.
Amazon Republic Day Offer Details:
The offer starts from 23rd January and ends on 26th January 11:59PM.
So, the offer has already started and you must act fast to avail the deals or else the products might go out of stock.
How to Avail the Offer on Amazon India:
The steps are pretty much simple and straight forward. If you have already been doing online shopping its very easy for you to go ahead, follow the steps below.
First you must go to the deals page, click here for Amazon Republic Day Parade Sale Deals.
From there you can navigate various deals of your choice.
If you already have an account login or else register over a free account.
Then add your products to cart.
After you are done with all the steps proceed with payment.
You can either pay with Debit Cards, Credit Cards and for most of the goods you can also opt for Cash on Delivery (CEO).
A Savings Tip: You will get extra 10% cashback if you are shopping with HDFC Bank. HDFC card holders can enjoy 10% cashback on purchases over INR 7,500 while Amex card holders can enjoy 10% off on purchases over INR 7,500 from 23rd to 26th of January 2015.

Acer Liquid E700 Review

Acer Liquid E700 has been launched today on 8th December 2014 and its about to go for the first sale today only via Snapdeal exclusively. Its comes with decent hardware specs which includes an octa core 1.3 Ghz CPU, but some of the key unique features include 2 Gb RAM, Triple SIM, LED Flash for front camera which could eventually make your low light selfie photos look good. In this review we help you find out whether its worth investing money on this affordable quad core which has some good specifications for the price.

Acer Liquid E700 Quick Specs
    Display Size: 5 inch IPS LCD capacitive touch screen with 720 x 1280 HD resolution
    Processor: 1.3 GHz Quad Core MediaTek MT6582
    RAM: 2 Gb
    Software Version: Android 4.4.2 (KitKat) OS
    Camera: 8 MP AF Camera with LED Flash
    Secondary Camera: 2 MP Front-Facing Camera FF [Fixed Focus] with LED Flash
    Internal Storage: 16 GB
    External Storage: Expandable up to 32GB
    Battery: 3500 mAh battery Lithium Ion ( Non removable )
    Connectivity: 3G, Wi-Fi 802.11 b/g/n, Bluetooth 4.0 with A2DP, aGPS, 3.5mm audio jack, FM Radio
    Others: OTG Support – Yes, Dual SIM – Yes, LED Indicator – Yes ( Color Cannot Be Changed, it behind the Ear Piece Mesh )
    Sensors: Accelerometer, gyro, proximity and magnetic field sensor.
    SAR Values: (Not Known Yet)
    Physical Dimensions ( Length, Width and Thickness): 147.3 x 73 x 9.9 mm
    SIM Card Slot Size: First Slot Normal SIM ( 3G and 2G ), Second Slot Normal SIM ( 2G and 3G) and Third Slot Normal SIM (2G Only)

Box Contents

Inside the box you get a handset, MicroUSB to USB cable, USB Charger ( output current 2 AMP), In Ear Headphones with mic to take calls, One Screen protector, Service Center list, warranty card etc.
Build Quality, Design and Form Factor

Acer Liquid E700 is a well built phone comes in black color with matte rubberized finish back cover which make the phone comfortable to hold and provide a good grip as well in your hands. Its weigh around 155 grams which makes it neither light nor heavy to hold and thickness of 9.9 mm does make you feel, its not thin phone but rounded edges does compensate a bit for the extra thickness.
Camera Performance

The rear 8MP camera AF camera can take decent long shots and good macro shots in day light and low light performance is also good. The rear camera can also record can record 720p video but at 30 fps. The front fixed focus 2MP camera can take decent selfie shots both with and without light. Selfie photos were not too great but good enough compared to what you get at this price point on other devices. See the camer review video and camera samples below to know more.
Display and Battery Backup

It has got 5 Inch of IPS LCD display with 720 x 1280 pixels resolution which gives good clarity on readable text on this display. Its an IPS LCD with good viewing angles and color reproduction is decent if not too good. Display is sensitive to finger touch with 5 point multi touch support and does not have scratch resistant screen protection glass.

Acer Liquid E700 comes with 3500 mAh battery which can last for a day easily. You can get around 1.5 to 2 days of battery backup with basic to moderate usage on this phone. For heavy users battery can last upto 5 to 6 hours on continuous usage with HD game playback or with HD Video movie playback or anything else resource intensive.
Memory, Storage and OTA Update

It comes loaded with 16 GB of Internal Storage and 2GB RAM. You will get around 1.5 GB free RAM on first boot once you setup the phone. Free RAM can be used to install and run heavy or moderate graphic games and apps and can run them smoothly as well. Out of 16 GB storage, you get 12.46 GB available to user for installing apps and games.  You can move apps or games from phone memory to SD card. OTG can always help with low storage issues and is supported on this phone. You will get OTA update for Lollipop but when, there is no info about that available as if now.
Software, Benchmarks and Gaming

Acer Liquid E700 runs custom UI on top of android which is responsive and shows very minor lag in animations, home screen movement and app close and opening on heavy usage but no lag in normal day to day usage. We played Temple Run OZ and Asphalt 8 and both of these games played fine without any graphic lag. For Asphalt 8 in high visual mode we experienced slight amount of frame drops but with moderate graphics we could play it smoothly without any issues. Game onscreen controls were accessible and touch screen was responsive while playing games, see the gaming review video below to know more.

Other Important Things

    Internet Sharing: You can create a portable Wifi Hotspot to share 3G Internet using any SIM card.
    Audio Recording and Noise Cancellation: It has dual mic, you can get an idea about noise cancellation in camera sample video above.
    Phone Grip: Phone grip is good with matte back cover.
    Backlit LED on Touch Capacitive Buttons: No
    Display Protection Glass: No Info
    Slow Motion Video Recording: No

What We Liked

    Big Battery Backup
    Front Camera LED Flash
    2 GB RAM

What We Did Not Liked

    No Backlit LED for Touch Capacitive Buttons

Verdict and Price

Acer Liquid E700 has been launched at a price of Rs. 11,999  and at this price point, its great value for money for the price with some key features like big battery, 2 GB RAM and Flash for front camera as well which can be well used to take good group selfie photos in low light conditions. The only bad thing would be missing backlit LED light for touch capacitive navigation buttons at bottom front of the phone.

Monday, January 12, 2015

How To Root Your Android

Root your Android smartphone easily without any complications right away using free Windows utility Kingo Android Root which allows you to customize the settings and take control of the smartphone easily. Go through this whole post and get to know more how you can Root your Android device easily with much effectiveness in a short span of time.

Root Android Smartphone with Kingo Android Root


Rooting of an Android device allows its users to get access to run special high-end applications and get privileged control over the smart device. In other words Rooting of Android device allows the users to unlock the pre-defined OS and replace the firmware with the user’s desired firmware and makes the job of customization of the smart device more easy and convenient. Tech geeks might have been familiar with the Android smartphone rooting while it may sound and may correspond like scary and risky perplexed process. There were few instances where a single wrong move or option had come led to worst consequences which are unexpected and undesired.

Fortunately, Kingo Android Root made this job of Android Rooting a simple kids game and well-fixed with all coveted features. Kingo Android Root has been good at the benchmark tests and went on well during the tests and the mesmerizing fact is that it is absolutely free. We commend users to check out the compatibility of their device to minimize any sort of error while rooting your smartphone. Go through the step by step guide to Root your Android smartphone using Kingo Android Root.

Before going along Rooting your Android smartphone do exercise these steps,

    Make sure that your device is charged to 60 % at least as it may turn off during the rooting process interrupting the whole thing.
    Enable the USB Debugging option by browsing through Settings> Developer Options> USB Debugging.
    Make sure that you have all the USB drivers of your corresponding Android smartphone.
    Have a backup of all your data using the default authorized desktop manager for android or any third-party app downloaded from the Google Play store.

Step by Step Simple Guide to Root Android Smartphones Easily Using Kingo Android Root


Step 1: Kingo Android Root must be downloaded and installed in your PC/Laptop. CLICK here to Download Kingo Android Root.
Step 2: Enable USB debugging mode on your phone.
Step 3: Connect your Android Smartphone to the PC/Laptop using a USB Cable and Run Android root on your PC.
Step 4: After successfully pairing your Android smartphone with Laptop/PC, click Root option and hold yourselves back patiently while the Kingo Android Root whole job.

Step 5: Congratulations you Android smartphone has been rooted successfully and if you wish to revert the changes which were made to your Android smartphone then connect your smartphone again with the  PC/Laptop repeating the prior process and click Remove Root option which would undo the changes.
Wasn’t that much easy and a pleasurable job of Android rooting your smartphone. Share your views and Android rooting experiences with us hitting the comments below and share this trick for a rooted Android phone with your friend


HTC’s New 5.5-inch Desire 826 Smartphone Review Specifications

HTC has announced the launch of the HTC Desire 826, which is the company’s latest smartphone in the Desire range. Years ago, HTC’s flagship devices fell under the Desire brand. In recent years, the Desire brand has been shifted to more budget oriented devices. The Desire 826 is a sibling of, and possible successor to, the Desire 820 which Launch reviewed in November. The new Desire sports a 5.5-inch display with 1080 x 1920 pixels and runs on a 64-bit Qualcomm Snapdragon 615 Octa-core processor clocked at 1.5 GHz. Aesthetically, the Desire 826 borrows a lot of features from the HTC Desire Eye, which launched a few months back.

HTC Desire 826 Smartphone Features & Specs:


At CES 2015 event, HTC has just announced HTC Desire 826 powered by the new Snapdragon 615. HTC Desire 826 features a 5.5 inch Full HD 1080p display and is powered by 1.7 GHz 64-bit Qualcommn Snapdragon 615 octa-core  processor along with Adreno 405 GPU and 2 GB of RAM. The phone runs Android 5.0 Lollipop out of the box and would be the first phone in the desire series to run Lollipop.
The Desire 826 has HTC’s signature BoomSound speakers and like the Desire Eye they are cleverly hidden beneath the screen and the top/bottom bezels. Spec wise the device looks similar to HTC Desire EYE and it comes with 13MP rear camera and a 4 Ultra pixel front facing camera for selfies. This means that you should be able to take high quality selfies in low light situations. The rear camera is a more conventional 13MP unit with a f2.0 lens.

HTC Desire 826 Full Specifications:


    5.5-inch display with 1080 x 1920 pixels
    64-bit Qualcomm Snapdragon 615 Octa-core processor clocked at 1.5 GHz
    Android 5.0 with Sense UI
    2GB RAM
    16GB storage, expandable via micro SD card
    13MP rear camera, 4 ultra pixel front camera
    2600mAh battery
    4G LTE
    Adreno 405 GPU
    Dual SIM support
    HTC BoomSound, Dual frontal stereo speakers with built-in amplifiers, Dolby Audio

Camera:

Moving on to the camera configuration, there is a 13 MP rear-facing unit, in addition to a 4 MP UltraPixel snapper at the front, which was last seen in the flagship HTC One (M8). Moreover, this handset also gets the Desire EYE software suite of camera-specific features. It also supports features like LED Flash, Video Calling & Auto focus.
This is the first time HTC has included the Ultrapixel camera for the front cam which should be interesting as more and more OEMs are now focusing on selfie camera.
Connectivity:  4G LTE  support, 3G, Wi-Fi, Bluetooth 4.0, GPS, Headphones, USB


Dispaly: In classic HTC fashion, the phone is attractive with Display only. HTC Desire 826 sports a 5.5-inch display with 1080 x 1920 pixels screen resolution. The dimensions are 6.22 x 3.05 x 0.31 inches (158 x 77.5 x 7.9 mm).
Battery: A 2,600mAh battery is pretty midrange for a phone this size. Performance will really depend on how efficient that chipset proves to be.
Audio: The 826 still features items like BoomSound – an HTC staple that still, we feel, is an amazing inclusion – now including Dolby audio enhancement as well.

 Hardware:


The powerhouse pumping life into the gizmo is the 64-bit Qualcomm Snapdragon 615 Octa-core processor clocked at 1.7 GHz. There is also 2GB of RAM available along with 16GB internal memory (which is expandable by virtue of memory card) and Adreno 405 GPU (Graphics processor)
Storage: In terms of storage, there is 16GB of flash and support for a micro SD card. The Desire 826 will be a dual-SIM device (except for in a few countries) and supports 4G LTE.

Software:


The good news is that it runs Android 5.0 with HTC Sense on top, so you won’t have to wait for HTC to make the upgrade to Lollipop. The phone runs Android 5.0 Lollipop out of the box and would be the first phone in the desire series to run Lollipop.

Price and Availability:

The HTC Desire 826 will be available with cellular operators and major retailers in Asia-Pacific at the end of January 2015 in two-tone colors including White Birch, Blue Lagoon, and Purple Fire. It comes in multiple colors, including but not limited to white, purple, and blue. There is currently no word on what to expect for pricing, but it should be similar to the launch price of the Desire 826.

Stay tuned to our website and get latest news!

Micromax to have 10,000 Yu Yureka units for sale on Amazon tomorrow

Yu, a subsidiary of India’s second-largest smartphone maker Micromax, will put up for sale 10,000 units of its 4G device ‘Yureka’ as part of maiden sale on January 13. Yu had unveiled the device last month and said it will be priced at Rs 8,999.

“We saw unprecedented response with over three lakh registrations. Registrations were to be open till 25th December. However, owing to the mega response they had to be closed a day earlier,” Micromax co-founder Rahul Sharma told PTI.

The registrations were within India, but the launch has elicited interest from overseas markets as well, he added.

Focussed on the fast growing segment of tech enthusiasts, Micromax had launched the new subsidiary last year. The first device to be launched by Yu is in partnership with Cyanogen OS. Based on Android operating system, CyanogenMod offers features and options not found in the official firmware that is distributed by most mobile device vendors.

The dual SIM device will be put on sale for registered users on eCommerce firm Amazon.In. Under the weekly flash sale, a sales model made popular by Chinese handset maker Xiaomi, users will have to register themselves again for the next round of of sale, which will be announced on December 13 itself.

Amazon will also offer Cash on Delivery for Yureka customers. “We are working on ramping our capacities. Given the kind of enthusiasm that we have seen, we will increase the number of units put out for sale gradually,” he said.

Yureka is a 4G device, which features Qualcomm Snapdragon 615 octacore processor and 64-bit multi-core CPU, 5.5-inch HD IPS display, 2GB RAM, 16GB ROM, 12.5GB memory (for apps and mass storage and expandable up to 32 GB), 13MP rear and 5MP front camera and 2,500 mAh battery.

A differentiating factor is that Yu will allow users to root their devices, without voiding the warranty. “This will allow users to run endless customisation on their devices and offer an enhanced product experience, presently not being supported by any other brand in the country,” Sharma said.

According to research firm IDC, the smartphone market in India grew at 84 per cent year-on-year in the quarter ended June 2014 to 18.42 million units from 10.02 million units (in April-June 2013 quarter).

Korean handset maker Samsung led the smartphone market with 29 per cent share, followed by Micromax (18 per cent), Karbonn (8 per cent) and Lava (6 per cent).

Friday, January 9, 2015

How to Protect Google Chrome Browser with Password?

In present days everyone uses internet for different purposes and most of them uses Chrome browser to browse different websites, play games online and to do so many things. If you are the only user of your computer then there is no problem but if your PC is used by others then you must be worried about your settings, browsing history, saved passwords and everything what you did on internet. To prevent from this situation you can protect your browser with password, but no browser will provide an option to lock your browser with password.

Don’t worry we come up with one smart extension which protects your online session history, your web services passwords and so many other things.

ChromePW:

ChromePW is the ultimate extension for chrome users to protect their web browsers from others without accessing. It provides an incredible solution to lock down your browser with password. Actually all browsers have some security about storing passwords but no browser give full support to protect everything which is related to you on browser. This extension gives so many options which tighten your browser security. Here security means it doesn’t stop hacker attacks and malware attacks, it only protects your browser from other users who try to access physically.

How to Setup password Protection to Chrome Browser?
1. First of all you need to download chromePW extension from the below link, after downloading extension install it on your browser by clicking on Add button.

2. After installing it shows a message which means extension installed successfully, before using it you need to do some configurations. Click on Ok button to continue extension setup.
3. Now you need to enable this chrome extension on “Incognito mode” also, because someone try to open it on private browsing mode. After enable it on Incognito mode click on next button.

4. Now it shows another window with some FAQ(Frequently asked questions) and answers. It listed four questions about security of extension and provide some tips to harden your browser security. If you use non windows operating system then choose your operating system from drop down list. For future purpose print all question and answers
5. After that click on Next button and you will see extension security settings. It have 4 widgets and each one have some sort of settings.

6. First type password which is not easy to guessed by others and again type the same password, type password hint which will be useful in case of forgetting password.
7. Click on save button to turn on password protection, you can set automatic lock for your browser after certain time. Then it will automatically locks your browser with password protection.
8. You must enable security mode because it protects chromepw extension being terminated by task manager. If anyone try to open another program while chrome browser locked it will automatically closed.

9. You can also block websites from this extension and if you want to reset this extension settings and password click on Reset Button.

As mentioned earlier this doesn’t provide full security because someone try to remove this extension folder who use your computer, so to get advanced security you must follow guidelines provided by this extension at the time of password setup. I try this extension in my chrome browser and it works efficiently without creating any problems. This will surely protect your browsing data, saved passwords and other important data stored on browser.


Top 110 Free Proxy Server List 2015


    Unlock My Web – http://www.unblockmyweb.com/
    Proxy Site – https://www.proxysite.com/
    Hide My Ass – https://www.hidemyass.com/
    Proxify – https://proxify.com/ (3 days trial)
    Free YouTube Proxy – http://www.youtubeunblockproxy.com/
    Proxy – http://proxy.org/
    England Proxy – https://www.englandproxy.co.uk/
    Unblocker – https://www.unblocker.us/
    Fast USA Proxy – http://fastusaproxy.com/
    New IP Now – http://newipnow.com/
    Anonymouse – http://anonymouse.org/anonwww.html
    Hidden Digital Info – http://hiddendigital.info/
    Anony Mizer – https://www.anonymizer.com/ (14 days free trial)
    K Proxy – http://www.kproxy.com/
    Don’t Filter – http://dontfilter.us/
    Working Proxy – https://www.workingproxy.net/
    Proxy 2014 – http://www.proxy2014.net/
    Prox Me Call Me Names – http://www.proxmecallmenames.com/
    Change IP & Country – http://anonymizer.nntime.com/
    VTunnel – http://vtunnel.com/
    Rapid Proxy – https://www.rapidproxy.us/
    Ninja Cloak – http://ninjacloak.com/
    Proxyo – http://proxyo.info/
    DeFilter – http://defilter.us/
    Quick Proxy – http://www.quickproxy.co.uk/
    Free Proxy Server – https://www.freeproxyserver.uk/
    Free You Proxy Tube – https://www.freeyouproxytube.com/
    The Best Proxy – https://www.thebestproxy.info/
    VPN Browse – http://vpnbrowse.com/
    Proxy 2014 – http://www.proxy-2014.com/
    Just Proxy – http://www.justproxy.co.uk/
    Extreme Proxy – https://www.extremeproxy.us/
    Fast School Proxy – https://www.fastschoolproxy.com/
    Remove Filters – https://www.removefilters.net/
    Monster Proxy – https://www.monsterproxy.co.uk/
    Hide Me Ass – https://www.hidemeass.co.uk/
    UK – Proxy – https://www.uk-proxy.org.uk/
    Proxy One – https://www.proxyone.net/
    Hide The Internet – https://www.hidetheinternet.com/
    Web Proxy Free – http://www.webproxyfree.net/
    World Cup Proxy – https://www.worldcupproxy.com/
    View Youtube – http://www.viewyoutube.net/
    Proxay – https://www.proxay.co.uk/
    Greatest Free Proxy – http://www.greatestfreeproxy.com/
    Mega Proxy – https://www.megaproxy.asia/
    Crazy Proxy – https://www.crazyproxy.org/
    IP Switcher – https://www.ipswitcher.us/
    Hide My Trax Proxy – https://hidemytraxproxy.ca/
    Stardoll Proxy – https://www.stardollproxy.com/
    Proxy 4 Freedom – http://proxy4freedom.com/
    Fish Proxy – http://fishproxy.com/
    See Proxy – http://seeproxy.me/
    Surf Proxy – http://surfproxy.co/
    Sporium – http://sporium.org/
    Saoudi Proxy – http://saoudiproxy.info/
    Proxy Browse – http://proxybrowse.info/
    Proxy Internet – http://proxy-internet.info/
    Ca Proxies – http://caproxies.info/
    Proxy 2015 – http://proxy-2015.info/
    FB Proxies – http://fbproxies.info/
    PK Proxy – http://pkproxy.info/
    America Proxy – http://americaproxy.info/
    Suede Proxy – http://suedeproxy.info/
    Korea Proxy – http://krproxy.info/
    Brazil Proxy – http://brazilproxy.info/
    ECXS – https://www.ecxs.asia/
    Zalmos Web Proxy – http://www.zalmos.com/
    Canada Proxy – http://canadaproxy.info/
    King Surf Proxy – http://www.kingsurfproxy.com/
    US Proxies – http://usproxies.info/
    US Proxy – http://usproxy.nu/
    Zacebook – http://www.zacebookpk.com/
    Your Proxy – http://proxys.pw/
    Just Unblock It – https://www.justunblockit.com/
    Go Proxy – https://www.goproxy.asia/
    Network Bypass – https://www.networkbypass.com/
    Me Hide – https://www.mehide.asia/
    Proxy This – https://www.proxythis.info/
    PHP Proxy – http://www.phproxysite.com/
    Xite Now – http://xitenow.com/
    4Ever Proxy – http://4everproxy.com/
    KProxy Site – http://www.kproxysite.com/
    Surf for Free – http://surf-for-free.com/
    Intern Cloud – http://interncloud.info/
    Pro Intern – http://prointern.info/
    Singapore Proxy – http://singaporeproxy.nu/
    Work Host – http://workhost.eu/
    Travel VPN – http://travelvpn.info/
    Fast Time – http://fasttime.info/
    Rexoss – http://rexoss.com/
    Hide IP Proxy – https://hideipproxy.com/
    Host App – http://hostapp.eu/
    Proxy Pirate – https://www.proxypirate.co.uk/
    Pun Proxy – https://www.funproxy.net/
    Hide N Seek – http://www.hidenseek.org/
    Orange Proxy – https://www.orangeproxy.net/
    Free Publick Proxy – http://www.freepublicproxy.net/
    Push Proxy – https://www.pushproxy.com/
    Cool Proxy – https://www.coolproxy.biz/
    Proxy Tube – https://www.proxytube.info/
    Free Open Proxy – http://www.freeopenproxy.com/
    Hope Proxy – http://www.hopeproxy.com/
    Safe Proxy – https://www.safeproxysite.com/
    Private Surf – https://www.privatesurf.us/
    Europe Proxy – https://www.europeproxy.eu/
    Stealth Proxy – https://www.stealthproxy.co.uk/
    SSL Proxy – https://www.sslproxy.org.uk/
    Proxy Power – https://www.proxypower.co.uk/
    Web Surf – https://www.websurf.in/
    You Server – http://youserver.nu/

Microsoft Office preview for Android tablets now available on Google Play

Back in November, Microsoft opened up early previews builds for its new mobile Office applications for Android tablets to those willing to sign up and wait for an invitation. After taking on feedback over the past couple of months, Microsoft has announced that it is expanding its preview scheme by releasing its Office applications to everyone directly through the Google Play Store.

The new Office software for mobile unifies Android, iOS, and Windows platforms. Previously each platform had to make do with its own apps, meaning that feature sets differed depending on your operating system and updates were often slow and intermittent. By unifying the Office platform, Microsoft hopes to bring updates and new features to users in a timelier manner.

There are still a couple of conditions attached to the preview builds though. Firstly, Office is still limited to ARM-based Android tablets with a screen size between 7 and 10.1 inches. Your tablet will also need to be running KitKat or Lollipop versions of Android, so users on Jelly Bean or earlier are out of luck.

If you are interested in trying out the preview builds of Microsoft’s improved office apps, here are the links for Word, Excel and PowerPoint. Let us know your thoughts in the comments below.


WhatsApp reaches 700 million active monthly users

WhatsApp, an internet based messaging service, has just announced that over 700 million users actively use its service each month. This makes the company the most popular mobile messaging service around the world, and is even more popular than Facebook Messenger. This surge in popularity comes as WhatsApp continues to dominate the Indian messaging market.

Back in August, WhatsApp claimed 600 million active users and has gained around 300 million users over the past year. The mobile messaging service was acquired by Facebook for $22 billion last year, but the social networking giant has seen losses on its investment so far, as WhatsApp’s 99-cent subscription model does not generate a large amount of revenue. WhatsApp saw losses of approximately $230 million in the first half of last year and generated revenue of only $15 million.

Facebook CEO, Mark Zuckerberg, expects that WhatApps will end up contributing to Facebook’s profits, eventually. However, he does not expect this to happen until the app’s regular user base reaches the one billion mark. Based on this recent rate of growth, WhatApp could reach this milestone before the end of 2015.

WhatsApp still has plenty of room for growth in markets where it currently isn’t a major player, such as the US or China. However, temping customers away from their current services may prove more difficult.

How to Get and Install Windows 10

Rumors about the next-gen Windows started shortly after Microsoft Build 2014, where the company released Windows 8.1 Update. Will it be called "Threshold" or "Windows 9" or simply "Windows"? Well, most of that was wrong: Windows 10 was announced at an enterprise computing event in San Francisco this week, and a technical preview followed the next day.
You can get Windows 10 now, but beware, it's a very early and unstable software build. I tested on a Surface Pro 3£1,049.95 at Amazon and not only did I see stability problems such as error messages when trying to run standard programs, but some features didn't work as expected. For example, the Charms no longer appeared when I pointed the mouse to the top-right corner of the screen (even though I'd set this option in Control Panel), and some window arrangements didn't look right.
To check out the major features of Microsoft's upcoming operating system, which is expected to arrive in 2015, check out PCMag's First Look at Windows 10 and 5 Reasons You'll Want Windows 10, as well as the video below. Then, if you're ready to take the plunge, follow the directions under the video.
Installing Windows 10 Technical Preview
Getting and installing the new OS was surprisingly simple, when starting from a Windows 8.1 PC. No going to the Windows Store or installing preliminary Windows Update packs as previous preview versions have required. And it's not as time-consuming as Windows installations have been in the past. It took less than 20 minutes. Ready? Lets begin!
1. Choose a PC you don't need for everyday use. Windows 10 Technical Preview is a very preliminary build, so you should not install it on a PC you need to use regularly. It's just for trying out the operating system and sending feedback to Microsoft so that the company can improve the final release. On that note, don't expect privacy on the test Windows 10 PC: Microsoft will examine system files in trying to rectify the problem code. Back up any files on the test PC that you may need. The OS doesn't require a touch screen, though it does support them, albeit Microsoft claims touch support is unpolished. Also note that you may not be able to revert to an earlier version of Windows after this installation.
 2. Check the specs for your test PC. If you're running Windows 8.1, there should be no problem. You can test for compatibility by downloading and running the Windows 8.1 Upgrade Assistant. In general, requirements aren't at all arduous. Here are Micro
soft's minimum system specs:
   • Processor: 1 gigahertz (GHz) or faster with support for PAE, NX, and SSE2
   • RAM: 1 gigabyte (GB) (32-bit) or 2 GB (64-bit)
   • Hard disk space: 16 GB (32-bit) or 20 GB (64-bit)
   • Graphics card: Microsoft DirectX 9 graphics device with WDDM driver
3. Head to preview.windows.com and sign up for the Windows Insider Program. You'll need to sign in to a Microsoft account, such as an Outlook.com email account. Once you're signed in, click the "Get started" button. You'll need to accept the Terms of Use and Privacy Statement. The next page tells you, "Congrats, you're an Insider." On the next page displayed, click on "Install Technical Preview." At this point, it's obligatory for me to tell you to make sure the power cord stays plugged in, lest you computer shuts down mid-install.
4. What appears next depends on whether you're running Windows 8.x or an earlier version of the OS. If you're running an earlier version of Windows, you'll see a purple "Get the upgrade" button:
If you're running Windows 8.x, you'll instead see a list of ISO disk image file downloads.
I recommend installing with an ISO disk image file. If you do run the setup on a pre-Windows 8 PC, it will prompt you to restart; but don't fret if you've clicked the button unintentionally and don't want to update the PC; it just adds an option to update after the reboot.
5. Download the ISO disk image file for your system type. These are available in 32-bit and 64-bit flavors, and I recommend the latter for any PC with a 64-bit processor, which means pretty much any PC less than five years old. There are also three language choices: English (with U.S. and U.K. options), Chinese, and Portuguese.
6. Create startup USB with USB Download Toolkit. You could also burn the .ISO file to a DVD, but these days USB keys are widely available and the target PC may not have a disc drive. I used the trusty Microsoft USB download tool, which you can download from CodePlex, Microsoft's open-source resource site.

7. Insert the USB key into the test PC. Then run setup.exe. You need to enter the serial number from the Technical Preview page to get started. For reference, it's NKJFK-GPHP7-G8C3J-P6JXR-HQRJR.
8. Sit back and watch the installation. First you'll see a small message box that says "Preparing" with a percentage counter:


9. Next, you'll have to accept the license terms.

10. You'll see a larger window saying that the installer is checking whether you're ready:
11. If all goes well, the window's text will change to "Ready to install." It will also say (if you're installing on Windows 8.x) that your personal files, settings, and apps will be kept, with an option to change what's kept.

12. Now the installation proper begins. The window text will change to say "Installing Windows Technical Preview."


This takes several minutes, and then the PC restarts, for the first time. After that, you see a screen saying "Setting Up," with a percentage counter. Another reboot. Now the screen says "Getting ready," with a throbber to the right. Next you'll see, "Applying PC settings," followed by another restart.
13. Finally, the screen will read "Setting up a few more things," and you'll see the familiar Windows 8.x setup screens, starting with Getting Online. Connect your Wi-Fi, enter your Microsoft account credentials, and your ready to take part in the future of Windows Operating systems!


9 Tips for Longer Laptop Battery Life

We've all been there. You're in a meeting, or on the road, or in a classroom, and you find, to your horror, that your laptop is nearly dead. Maybe you forgot your power adapter, maybe there isn't an available outlet. For whatever reason, your battery power is dwindling, and you still have stuff to get done. Hope is not lost, however. There are some things you can do to buy more time on that almost-dead battery so you can meet a deadline or respond to an important email before it's too late.
Some of these techniques are for when you need to stretch your battery at that very moment, while others are preventative measures, best implemented before your battery life comes up short. There is some of overlap between the short- and long-term strategies we'll outline below, but even when the actions are the same, the reasons behind it may be different.

Short-Term Battery-Stretching Strategies

If you're in a tough spot right now, there are things you can do to extend the battery life immediately. None of these actions will actually increase the amount of power left in the battery, but instead will reduce the amount of power the laptop is using, letting you squeeze in a few more precious minutes before the battery goes kaput. The name of the game in these instances is power consumption, and you need to reduce yours to as little as possible.

1. Activate Your Laptop's Battery Saver Mode or Eco Mode

Designed with these sorts of circumstances in mind, most Battery-Saver or Eco modes will engage a number of automatic changes to lengthen usable battery life—many of the same changes we'll be making here. This saved profile will adjust your laptop's settings and shift components into low-power states to help you ration your remaining juice a bit longer.
Once you've turned on the automatic battery-saver tool, there are still plenty of steps to take to eke out even better efficiency. This is done by turning off unnecessary devices, adjusting settings to reduce power consumption, shutting down unwanted apps and processes, and adjusting your activities to use less power.

2. Disable Unused Devices and Ports

The easiest way to reduce power consumption is to simply turn stuff off. Every component in your laptop needs power to function, but that doesn't mean you need to power all of those components all the time. Start by disconnecting any unneeded peripherals (like a USB mouse or external drive) and turning off the biggest power hogs, like Wi-Fi and Bluetooth radios, graphics processors, and unused optical drives.
WARNING: Before disabling any component or device, stop and make sure that this device is not in use, and that it is not essential to continuing operation of the laptop. For example, you DO NOT want to disable the hard drive that houses the operating system, or the processor the runs the entire laptop. Only disable those devices you are comfortable turning off.
To disable unused devices on a Windows system, open up your system's Control Panel and find the Device Manager. In the Device Manager, individual components are grouped by category. For example, Network Adapters will often include both the LAN adapter, which provides Ethernet connectivity, and Wi-Fi, for wireless networking.
The four standard candidates for saving power are the graphics card (found under Display Adapters), the optical drive (found under DVD/CD-ROM Drives), and the Ethernet and Wi-Fi adapters (under Network Adapters). Find the device you want to shut down within the relevant category. Right click on the device name, and select "Disable" from the drop down menu.
While you're in the Device Manager, you can also turn off any unused ports. Just like an extension cord left plugged into an outlet, these unused plugs still have power going through them, and losing some in the process. The actual impact on battery life will be minimal, but if you need to eke out another minute or two of life, this will help. Take a quick glance at your ports, and turn off anything that's not being used, like USB ports with nothing connected to them.
While you can disable USB ports on a Mac using the terminal program, it's something that IT administrators would use to lock down Macs for security purposes. We don't recommend doing it as an end user because it may make your system act up. You can, however, disable Bluetooth and Wi-Fi from the Menu bar at the top of the screen.

3. Adjust Your Settings

While you'll still have to use the display and the keyboard, you can adjust the settings for each to reduce power consumption. One often overlooked power drain is keyboard backlighting. Unless you're in the dark, and need the backlight just to make out each key, turn the backlight off entirely. You can typically assign a hotkey for this function.
The next power drain is your screen. While you need to keep the up and running to use the laptop, you don't necessarily need it running at 100-percent brightness or full resolution. Many laptops will have hotkeys for increasing and decreasing the screen brightness, but if not, it can be adjusted in the control panel. Reducing the display to 50 percent when you're running on battery power can add a significant amount of time.
Additionally, if you're simply typing up a document, you don't need all of the detail offered by a 1080p or higher display. Dialing down the screen resolution to a basic 1,366-by-768 resolution or lower reduces the amount of power used in graphics processing without negatively impacting your ability to work, letting your laptop a bit longer than at full resolution.
Finally, turn off or turn down the sound. If you need to hear, drop the sound down as low as you can, and consider switching from the laptop's larger speakers to a set of tiny earbuds to get the audio piped right to your ears. Whenever possible, just mute the laptop altogether. That way, the speakers won't be getting any power, and you'll buy yourself some more precious time.

4. Turn Off Apps and Processes

It's not just the hardware that's stealing your battery juice. Multiple apps and processes running on your system will also chew through battery life more quickly. As with the hardware, start by turning off anything that isn't being used.
In Windows, start by taking a look in your System Tray, the collection of icons in the lower right corner of the desktop, next to the clock. On the left end of the System Tray, select the icon to display hidden icons. Take note of which apps are running in the background.
Open up the Task Manager by pressing Ctrl+Shift+Esc, or use Ctrl+Alt+Del and select Task Manager from the menu. Once in the Task Manager, look at the open apps—you may find that a program or two have been left running simply because you forgot to close a window instead of minimizing it.
Next, go to the Processes tab. This shows you what processes are currently running on your machine. While some of these are needed, some, like those associated with music and video players or cloud storage services (like Dropbox or Google Drive) can be disabled without causing any problems.
For MacBooks, the process is a little different. Take a look at System Preferences > Users&Groups for a menu called Login Items. Delete any power-hungry programs that you don't need anymore, or disable things like Google Chrome's automatic launch at startup. You can also see programs that are using a lot of power at any given moment by holding down the Option key, then clicking on the battery indicator in the Menu bar. Alternately, you can open the Activity Monitor utility to see a list of all the programs and processes you currently have open , and which of these are using the most power. You can stop these processes by selecting the program and then clicking the Stop icon. Power Nap is an Apple OS X feature that checks your email and twitter feeds for activity while the system is asleep. If you are trying to maximize battery life, it would be wise to turn that feature off.

5. Simplify

You can also stretch your battery life by simplifying your own activities. Multitasking is nice when you have full power, but running several programs at once puts a greater load on the processor and draws more power. Adjust your computer use by sticking to one application at a time and avoiding resource-intensive programs.
Start by single-tasking—if you need to type up a document, close any additional programs. You'll get longer battery life by not running Spotify in the background. If you need to keep some tunes going, switch from streaming media to locally stored songs—you'll still be using some extra power to play them, but streaming media over Wi-Fi also uses the laptop's wireless radio.
You might also benefit from switching to simpler tools for the same tasks, like opting for a simple text file instead of a Word document. With fewer features and none of Word's automatic actions (like Spell Check and Autosave), you can do all the writing you need without using quite so much power. Some activities you'll want to avoid entirely, like photo and video editing tools, which place a significant load on the processor and graphics card, and are real power hogs.
By eliminating unnecessary power uses, you should be able to extend the life of your battery in those moments that you find yourself high and dry.